MW-Logo_#white
Menu
  • Find A Supplier
  • Blog
  • Galleries
  • Categories
  • Wedding Dresses
  • Real Weddings
  • Wedding DIY
  • Honeymoons
  • Magazines
  • Wedding Planning Tools
  • Advertising With Us
  • Login

Tips and Articles by category

Dresses
Cakes
Flowers
Honeymoon Ideas
DIY
Photography
Venues
Wedding Themes
Invitations
Wedding Ideas
Music
Videos
Wedding Hair and Makeup Ideas
Cars
Destination Weddings
Speeches
Gift Registries
Wedding Favours
Grooms

FIND A LOCAL WEDDING SUPPLIER

Reception Venues
Dress Retailers
Dress Designers
Cakes
Photography
Bridesmaids
Flowers
Video
Hair
Theming and Styling
Entertainment and Music
Makeup
Ceremony
Celebrants
Rings
Cars, Transport
Invitations
Bridal Accessories
Destination Weddings
Gifts and Gift Registries
Shoes
Accommodation
Honeymoons
Beauty Services
Hire
Hens & Bucks Parties
Flowers Girls/Page Boys
Caterers
Bomboniere
Alternative Bouquets
Planner
Photo Booths
Formal Wear
Speciality Services
Finance
Groom and Groomsmen
Grooms and Groomsmen

Wedding DIY – Placecards

Posted: November 7, 2012

Making the effort to consider where guests should be seated will take away any undue pressure and make them feel more comfortable, especially those who may not know others. Usually arranged in alphabetical order on a table at the entrance to the reception, each card should display guests' names along with table numbers.
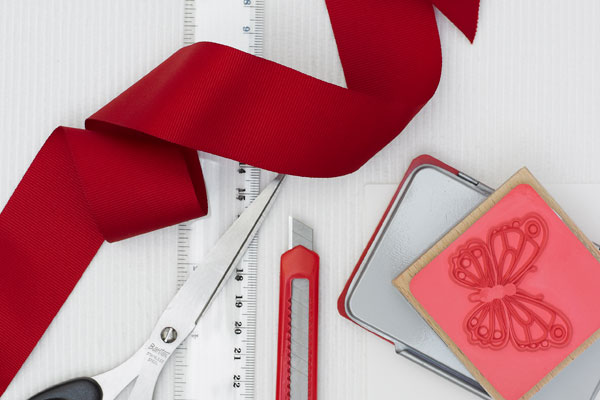
Materials

  • 160 gsm white card stock.
  • Butterfly stamp
  • Red ink pad
  • Stanley knife
  • Cutting mat
  • Scissors
  • Ribbon/paper
  • Paper glue or glue tape
  • Paper for labels
  • Bone folder

DIY-Stationary-04

How to create

  1. Cut card stock into 15cm x 9cm pieces.
  2. Using a faint pencil mark as a guide, stamp your butterfly in the centre of the card. Practice a few times on scraps of paper before starting on the final cards.
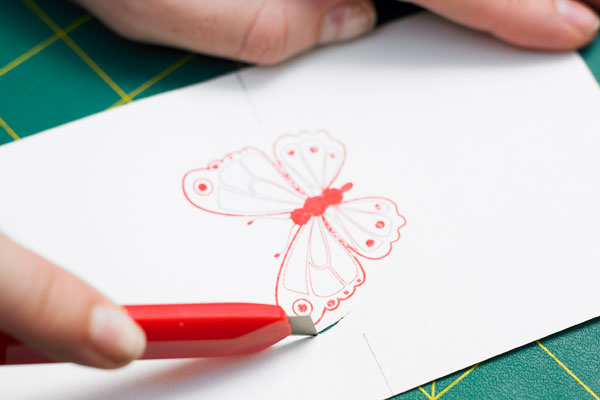
  3. Place stamped card on cutting mat. Holding the card with one hand cut around the top half of the butterfly leaving a 3mm (approx) border around the wings (see image 1). When cutting you may find it easier to keep the cutting blade firmly in place and move the card around to cut evenly through the paper.
    DIY-Stationary-03
  4. Fold the card in half using a bone folder. Remove any pencil lines with an eraser.
  5. Trim any rough edges around the butterfly with scissors to give you a better finish.
  6. Cut strips of ribbon or paper 2.5cm wide x 10cm long. Glue to card. There will be an overhang at the sides but this can be trimmed off.
  7. Print out you guests' names and cut into 2cm x 10 cm strips.
  8. Glue name strips onto the ribbon. Allow to dry before trimming the edges to line up with the edges of the card.

TIP: When making a large quantity, instead of completing one card at a time it may be easier to make them in stages, e.g. cutting all the butterflies out before moving onto the folding. Don't use glossy paper as the ink will smudge.

Previous Blog
Next Blog

Find a wedding supplier

OR

Let’s be inbox official!

Wedding obsessed? So are we! Become a Modern Wedding Muse to have updates delivered straight to your inbox plus receive exclusive offers from our suppliers!
  • like us on facebook
  • follow us on instagram
  • follow us on pinterest
  • MagSlider-SH4
  • MagSlider-Cakes20
  • planner-12
  • MagSlider-DIGIM74update
  • luxury-9
  • MW-78
  • DIY7
  • flowers-17
  • h&B12
Colour Wheel

Your next read!

Looking For Some Wedding Inspiration? We’ve Got You!

DIY-Twine-Flower-Feature

Easy DIY Twine Flower Instructions

Creative DIY Wedding Favours For The Crafty Bride

Popular Galleries

  • Real Weddings
  • Dresses
  • Cakes
  • Flowers
  • Theming & Styling

From Our Blog

  • Real Weddings
  • Wedding Fashion
  • Wedding Themes
  • Wedding DIY
  • Wedding Hair & Beauty

Wedding Tools

  • Seating Plan
  • Guest List
  • Check List
  • Budget

ModernWedding.com.au

  • Wedding Tools Login
  • About
  • Advertising Information
  • Contact
  • Sitemap
Modern Wedding

Copyright © 2021 Modern Wedding PTY LTD. All Rights Reserved. Website by The DMA.

  • Sitemap
  • Privacy Policy
  • Contact

Our other brands: Luxury Wedding Blog / Sydney Wedding Blog